Sunday, July 30, 2017

Ladybug and Rooster

Teaching Shapes for Toddlers with Paper Collage Activity
Part 6 : Semi Circle

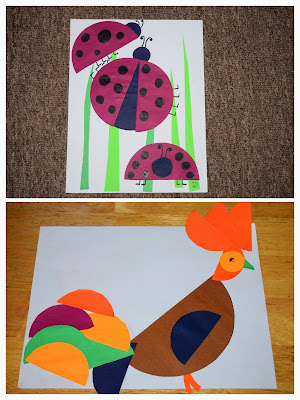
Now we are in the sixth shape of this shape collage series! Truly, I didn't get any collage idea for this shape. When me and LO were discussing about this (!) we ended up with semicircle shaped umbrella, rainbow..... But we didn't get a clear picture to make a collage with these ideas. Thanks to Google, we finalized with Rooster and Lady Bug๐Ÿ˜œ
semi circle shape collage

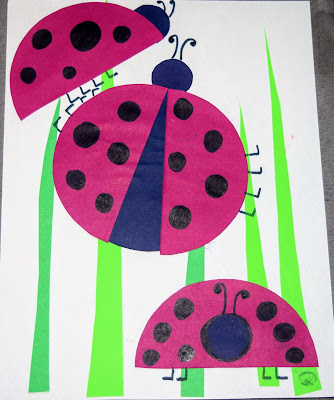
1. Lady Bug collage with Semi circle shape

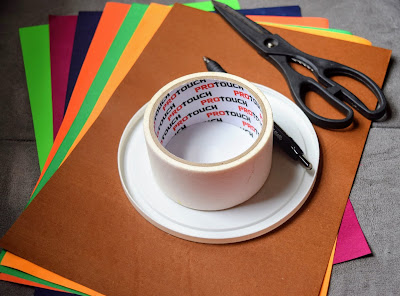
Supplies : White, red, black, green construction paper, scissors, glue, pen, black marker.


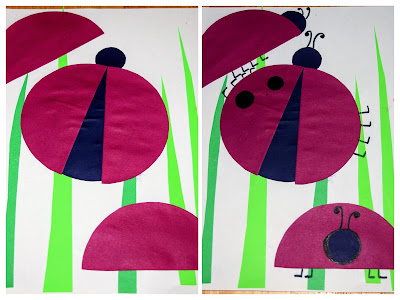
Get ready with the supplies and you are all set. Start by cutting the green grass. Then cut the black and red circles. Bifurcate the red circles, making the semi circles. Cut a small black circle for the head.

Start by gluing the grass. Then glue the black circle and the semi circle red wings.

Draw the black spots and legs using the black marker.

semi circle collage - lady bug
And the lady bug is ready to fly!!

semi circle collage - lady bug

2. Rooster Collage with Semi circle shape

Supplies: Construction paper - available colors, scissors, pen, circle shaped object, glue stick


Cut the semi circles - a big one for the body and rest smaller sized semi circles. Use the symmetry property to cut the semi circles!


Start by gluing the body and the head followed by feathers. Don't forget the eye and legs.
Cock-a-doddle-doo rooster is ready!!!

semi circle collage rooster

Try this semi-circle collage and share your experience in the comment box.

Happy Parenting!

Wednesday, July 26, 2017

Coloring on walls : Part 2 - Nursery Rhymes Themed Coloring Activity

Our earlier activity Coloring on wall was a big hit๐Ÿ˜œ, so we did another coloring activity on wall, with Nursery Rhymes based theme. This idea clicked in when LO was singing "Hickory Dickory Dock..." rhyme looking at the DIY clock I made. By the time I thought I should make a pendulum clock model using the cardboard for LO. Later I simplified my work on to the brown paper sketching!๐Ÿ˜œ And later this whole activity got completed by sketching few of LO's favorite rhymes. It was completely fun for me and LO and we thoroughly enjoyed it.


What we used:
  • Paper (I've kept some Kraft paper Amazon puts in their boxes and used few sheets for this activity)
  • Markers
  • Crayons
  • Sticky Tape
I started sketching with "Hickory Dickory Dock..." pendulum clock. The rest of the rhymes were LO's choice. I planned to use the DIY clock in this sketching. So I placed it at the center of the pendulum clock sketching. That time I didn't have any idea as how to proceed to the next rhyme. So I just relaxed and  LO started coloring the pendulum clock.


After the coloring is over I just asked him, 'What Rhyme you want next?' He immediately said "Wheels on the bus..."


"Twinkle Twinkle Little Star.." was the next rhyme. We drew daddy star, mummy star and baby star....๐Ÿ˜

Followed by "Baa Baa Black sheep..." LO wanted to draw brown sheep too...and of course 3 bags of wool.
My favorite sketching is the "Itsy Bitsy Spider..." rhyme.


LO's favorite was "Six Little ducks went out one day..." For this I made a duck template out of thick sheet and used that to draw the six ducks. LO wanted to write "Quack Quack.." too๐Ÿ˜Orange crayons seemed little milder on brown paper, so i gave him Orange oil pastel, and look how bright it is. LO's face also became brighter.


Our favorite was Finger Family rhyme!! I drew the fingers by tracing LO's palm and he got so excited by this.

We did this by sketching and coloring one rhyme per day and it took about a week to complete!
     

Try this out and share your views and suggestions in comment box below.

Happy Parenting! ๐Ÿ˜Š

Sunday, July 23, 2017

Alphabet Vehicles Activity

Learning the art of Compromise with Alphabet Vehicles Activity

When I run out of ideas for blog posts, LO is always my rescuer.๐Ÿ˜„ He does some new activity, from which I grab the idea for my next post! It's usual for LO to play with alphabet. This time he combined vehicles with Alphabet, and thus paved the way for this activity.
He has few collection of vehicles, which he sorted in alphabetical order. But with this activity I learned one thing, as how important is to learn the art of compromise at young age. Compromise is what makes relationships healthy and strong, methinks!๐Ÿ˜Œ. LO stayed very cool during this activity, doing all compromises he could. Let's look at how it happened.
As I have already posted, we have a list of A-Z vehicles. LO sorted vehicles and alphabet starting from A for Airplane, B for Bus,... When I noticed this play I wondered, would this go till the end, as we don't have an orderly collection of vehicles. But LO did it.๐Ÿ˜Š For few, like for I,X,Y,Z we didn't have matching vehicles, but he did a good compromise with what he had.

A for Airplane
B for Bus
C for Car
D for Dump truck

E for Excavator
F for Forklift
G for Garbage Truck
H for Helicopter
I for Ice cream truck
J for Jeep
K for Kart car
L for Lorry
For the letter I, we didn't have an ice cream truck, but he imagined a LEGO duplo's buildable car to be an ice cream truck. And for letter K, an old race car got a new name "kart car"!
M for Monster truck
N for Navigator
O for Oil Tanker
P for Police car
For letter "N" a SUV type car became Navigator car. For letter "O" a truck was compromised to be an oil tanker.
Q for Quad Bike
R for Race car
S for Steam engine
T for Tractor
For letter "Q" we had the ATV (All Terrain Vehicle). ATV is also called Quad bike.
U for Unmanned car
V for Van
W for Wagon
For letter "U" an ordinary car was named "unmanned car".
X for Xebec
Y for Yellow car
Z for Zeppelin
X for Xebec, we didn't have any resembling vehicles to alter, so I quickly did a paper boat๐Ÿ˜›. The thing is he happily accepted it!!! For "Y" we simply decided to have a yellow colored car. "Z" for Zeppelin we gave the rocket a new name๐Ÿ˜›.
At the end of the day we had a great time playing with alphabet and vehicles. Try this out or similar kinda activity which will give a chance for the kids to learn the art of compromise.

Happy Parenting!

Wednesday, July 12, 2017

Learning numbers - Play Dough Part 2

Hands On with Play Dough - Part 2

Take a look at my Play Dough Part 1 post.
This time LO initiated the play. I think this is very important because, self initiated play is always a hit. Its obvious that kids are interested (or they are "in a mood" I would say) in doing that particular activity, hence you can teach them something new in doing that activity.
He wanted to make impressions on play dough with shapes blocks. He did it for sometime and later I gave him magnetic numbers and he got excited, and went making impressions with that again and again.
As I have already mentioned, LO is little obsessed with handling these dough. So I wanted to do something different other than impressions, so I made numbers with Dough.


LO got excited looking at the play dough numbers and showed interest in playing with them. He  went handling the numbers and transferred them to his sit and spin chair. The numbers got deformed while transferring and he tried by all means to put them back, but he couldn't!๐Ÿ˜Š 

He combined the magnetic numbers with this play and went sorting them on the chair.


Again he transferred the play dough numbers to the top of the chair. 


It was a fun filled play for LO. I think this is a great way to teach numbers for toddlers. 

Happy Parenting!

Make it with Diamonds!

Teaching Shapes for Toddlers - With Paper Collage Activity
Part 5 : Diamond

This week we did these two simple collage with diamond shaped pieces, a flower and a turkey.


Flower Collage with Diamond Shape:
What you will need: Construction Paper - Yellow and Green, Glue stick, Scissors, Pencil


1. To cut the diamond pieces, use the symmetry concept! Fold the paper longitudinally and horizontally, just draw a slating line along the creases, (like a right angled triangle) cut it open to get a diamond.


LO enjoyed doing the diamond shape flower collage. Hope you like it and do give a try.

2. Turkey Collage with Diamond Shape

Supplies: Construction Paper - Yellow, Orange or Red, Brown, Glue stick, Scissors, Pencil


1. Cut an oval and circle from the brown paper, to make the body of the turkey.
2. Cut Diamond shapes to make the feathers. You can use colors of your choice. 
3. For both the collages I helped LO in placing the diamond pieces in the right place.
4. You can use googly eyes for more effect.


Do give a try and share your comments in the comment box.

Happy Parenting!


Friday, July 7, 2017

Making of Alphabet on wall : Part 3 

Protraction of Part 2...

S for Sun
Simple Sun using Pipe Cleaners, Crayons and Paper. Also try Snail, SUV, baby Sneakers, Sparrow, Snow man...


T for Train
Train and Teddy!

U for Umbrella
Again a craft work using Foam sheet, you will enjoy making this but not that easy as it looks!


V for Vase
This is a lemon juice container, with a pipe cleaner Violet flower! Also think of Violin, Violet, Van...


W for Whale
This whale is a foam sheet cutting pasted on white paper. You can hang a watch or point a wall clock.


X for Xylophone
Hung a store bought Xylophone. X-mas tree and X-ray make good alternatives.


Y for Yellow
Made it very simple by pasting a yellow foam sheet on wall. Picture of Yak, Yacht,... are other choices.

Z for Zebra
Hung a store bought toy. If not Zebra, think of Zucchini, Zoo....


Our living room still has these alphas on its wall, and its a real pleasure for LO to look at these. 

Happy Parenting!