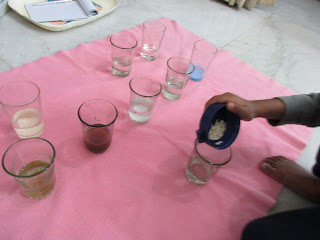
This is LO'S first ever so called "Science Experiment"!!πI just wanted to do a simple one, to start with, so chose the solubility test. Whether the kids learn or not, understand the science concept or not, it is definitely a fun time for them π»(not for me though!π protecting the glasses and seeing to that the water doesn't spill and taking care that LO doesn't make the place a messy fades all my fun and keeps my eyes big openπππ)
Things you might need:
6-9 cups (no single-use plastics please!, I used glass cups)
A spoon
Water
Pantry items (Your choice)
What I used for the solubility test:
White Sugar
Brown Sugar
Palm Sugar (crystals)
Table Salt
Rock Salt
Washing powder (just for the blue color!)
Rice
Oats
Baking soda
How we tested:
First, I asked LO to fill the glasses with water till half of its level.
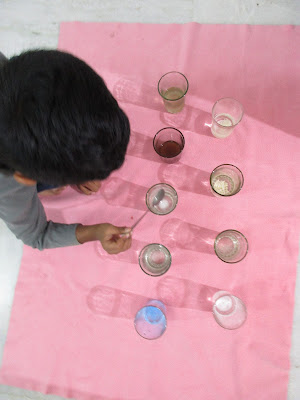
Then I asked him to help me out in adding the solids to the water.
Trust me I didn't expect him to catch the the meaning of solubility this easy! He stirred the solution in each glass with the spoon to check if the solids are still or got vanished in water.
I asked him which are the substance that got vanished in water, and he was able to identify. And I asked him to write in a paper categorizing the two. He wrote what he observed and what he understood!
But can't convince him the fact that even the washing powder and palm sugar too are soluble in water.Since they both didn't leave the water clear, as salt and sugar didππ(tough job indeed!!)
And finally when I was about to clean up the set up, LO said he wanted to keep it as it is, to show his cousin bother and sister, who will come home a month later!!π³π(as my eyes kept supervising the glasses wide open!!ππ)
At the end it was a fun filled time for LO, though he didn't realize this as a basic STEM activity.
As my LO is in Upper Kindergarten(Growing tremendously fast! Can't believe he is in KG!π²), I thought this is the right time to expose him to organized STEM activities. So you can come across interesting mini experiments and fun STEM activities in this space which would blow the little minds!!
If your kiddo is crazy about cars this is a great activity to teach them their name during play. Almost no setup play activity, I would say. You just need paper rolls and toy cars. Write their name with each letter on a roll, likewise on the cars. All set and we are ready for the fun learning activity. Place the cars in wrong order and watch them park the cars inside the right roll.
LO helped me in writing the letters and sticking them onto the cars.
I got this idea when I went to LO's school, and from that time I wanted to do with LO at home. But by then, the winter was almost over and there wasn't any snow shower to my disappointment. Surprisingly this spring we had couple of snow showersπ⛄☃, and I managed to collect some snow for this painting! I believe it snowed during spring just for me!!π
When I was thinking what to paint with the snow, idea came through LO! That week, LO's class was doing Rainbow related activities to welcome the spring. So I thought to combine the spring and winter, and thus the Rainbow on Snow idea emerged!π
I collected snow in an aluminium tray and used washable colors. You can dilute the colors, which when done is much easier to use. We used a dropper to color, which we get along with the tonics.
Used a plastic egg carton to dilute the colors!π¬
And finally the VIBGYORπ on snow!
When left undisturbed for some time you can see the snow melting to form a beautiful 'Rainbow on Water'!!π
When you set for a free play, the kids find some freakish ideas to do with. This is one of a kind from LO and Meπ We used Lego, Googly eyes, Cars.. to bring out these bizarre snaps.
Though in our place officially the spring season signed in, I'm not sure, why winter decided to remain obdurate until April to commence. I thought to make this Penguin craft with LO by the time we wait to see the little green buds on the trees.
I hope you like this Hand Print Penguin craft. Give a try and let me know how it turned out.
Our recent DIY cardboard craft activity was a huge hit with my little one! He loved it so much that he even joined me while making this fun cardboard box project. At home, we always try to upcycle package boxes creatively before tossing them in the trash — a simple way to encourage sustainability and hands-on learning.
This time, I originally planned to make a train track tunnel craft. But thanks to my LO’s spontaneous ideas and adorable requests, we ended up creating many more fun pieces too! π Usually, I start my kids’ crafts with a clear plan, but my little one loves to throw in suggestions or ask for small add-ons — which completely transforms the project into something even more exciting and unique.
This activity was the perfect blend of creative play, learning, and bonding time. If you’re looking for easy upcycling ideas or cardboard activities for toddlers and preschoolers, this one is sure to spark joy and imagination!
For this cardboard craft, we used recycled materials like cardboard
boxes, along with various craft supplies such as scissors and glue, and marker
pens. It's important to keep safety in mind when doing. LO helped me in gluing
and writing stuffs. Keep the knife out of kid's reach.
I made all the pencil markings and LO turned them to markers. And Kids can also contribute by coloring with the crayons.
We made a Police Station and Car wash on one side.
Fire Station and Hospital on the other side. LO badly wanted to make a school, but we didn't have any school bus in our vehicle collection so I avoided it.
On the top of the box, we made just a highway kinda setup, with gas station, sign boards, trees.. etc.
He collected all the appropriate vehicles along with the figurines!
We made a tunnel for the train (which was my actual plan!), finally..π
This was be absolutely fun. LO helped me in coloring, writing and gluing. I'm sure LO would have felt a sense of achievement!! π
The best part was LO's patience...! He was patient enough to wait until I captured all the snaps!!
Please try out this activity with your kids during this summer and let me know how it came out. You can customize the box according to your needs, based on the availability of the vehicles, and importantly your kids' choice!!
Do you
have a little one who is completely obsessed with the ABCs?
My 3.5-year-old son went through a phase
where everything had to connect to the alphabet — from toys to stories, even
what he ate sometimes! Instead of just letting it pass, I thought, “Why not
turn this into a learning opportunity?”
That’s how this A-Z Adjectives Chart came to life.
We sat together and picked a word for
every single letter.
Words like Adorable, Brave, Caring,
Fearless, Generous, Happy, Kind, Optimistic, Talented, Wise, Zany —
and many more!
Every day we would act out the words, use
them in silly sentences, or find examples around the house. Suddenly, letters
were no longer just letters — they became feelings, actions, and personalities.
Why
Teach Adjectives to Toddlers?
·Vocabulary Building – Gives kids new ways to express
themselves.
·Emotional Awareness – Words like “angry,” “calm,” and
“happy” help them understand emotions.
·Alphabet Reinforcement – Perfect for kids who already love
their ABCs.
·Interactive Fun – Acting out “zany” or “mysterious”
is hilarious for both parent and child!
If
your child loves ABCs as much as mine does, here are some more fun ways to play
and learn:
Print it, stick it on the wall, or keep it
handy during playtime — your child will love pointing out letters and learning
new words.
This
little activity turned into so much more than just learning words — it became
our way of connecting, laughing, and growing together.
If you
try this at home, I’d love to know how your little one reacts! Drop a comment
below or share a picture on Instagram and tag me — it would make my day.
Because at the end of the day, learning is
fun, but learning together is
priceless. π